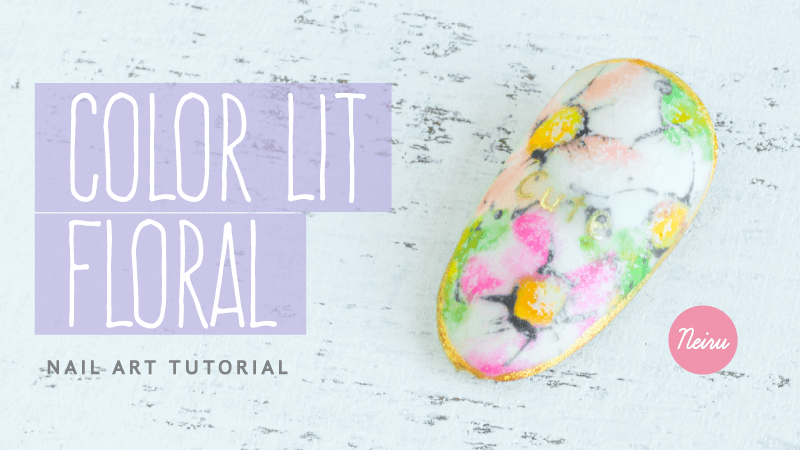
Neiru Mini Tutorial – Color Lit Floral
“Don’t worry if the flower looks a bit messy… it’ll add to the overall look…”
Hi there, just in time for the upcoming Spring season, I’m going to show you how to create this ‘Color Lit Floral’ nail art! Keepin mind that while in the middle of making this design you may feel unsure of how this design will turn out like – but not to worry, it’s what creating and experimenting is ALL ABOUT!
Rest assured though, this is a really easy look that looks much harder that it is, AND you don’t need to worry too much if the flower looks a bit messy – it’ll add to the overall look!
With an outline and white to fade the design, you’ll fall in love with the overall design!
今回は、Color Lit Floral の作り方を紹介します!
作業中、あまり見栄えが良くなく見えるかもしれませんが、最後にはとっても可愛く仕上がります!
難しく考えなくてもちょっと汚くみえても大丈夫です!
ラインを入れることで、しっかり可愛くなるにでご心配無く♪

Step 1:
Take some ivory and pink color on each side of angular brush. (Here I am using tati Artchocolat Mimosa brush)
Absorb the color and create a gradation on the brush.
少量のアイボリーとピンクをアンギュラーブラシの半分ずつに取ります。
しっかりとカラーをブラシに馴染ませます。

Step 2:
Note, I’ve been applied 2 coats of ivory for base and cured.
With an up and down motion, paint 5 flower petals with the angular brush.
アイボリーを2度塗り硬化します。
先ほどのブラシを上から下に動かしながら、5枚の花びらを描きます。

Step 3:
Clean the brush and take some ivory and salmon pink color on each side of the brush.
Absorb the color and make a gradation on the brush.
ブラシを綺麗にしたら、アイボリーとサーモンピンクのカラーを同様にブラシの片側ずつにつけます。
ブラシの中でグラデーションになるように馴染ませます。

Step 4:
Draw another flower diagonally above of the first pink flower.
斜め上の位置辺りに、もう一つお花を描きます。

Step 5:
Change the color to light blue and do step 3 and 4 again. Paint the last flower wherever you have some empty space.
Then cure!
次にアイボリーと水色に変え、ステップ3と4を繰り返します。
最後の花は、空いている場所に描き、硬化します。

Step 6:
Use some brown and paint inside the center flowers. The more irregular of a shape, the better.
Then Cure.
ブラウンをそれぞれの花の花芯となる場所にランダムに置き、硬化します。

Step 7:
With some yellow, paint on top of the brown. Though, make sure you don’t cover all of the brown with the yellow.
Then cure.
ブラウンを全て埋めてしまわないように、イエローをブラウンの上に乗せ硬化します。

Step 8:
Mix with some green and nail wipe liquid to dilute the green to a watery consistency.
少量のワイプ液とグリーンを混ぜ合わせ、薄めのグリーンを作ります。

Step 9:
Here I am using the tati Artchocolat Gris brush. Paint the green around the flowers. The nail wipe will evaporate and help create some visual depth in the green color.
ワイプ液と混ぜたグリーンを、花の周りにランダムに乗せていきます。

Step 10:
Change the color to lighter green and do step 8 and 9 again.
Then cure.
黄緑に変え、ステップ8、9を繰り返します。
硬化。

Step 11:
Add some golden yellow on top of the yellow center of flowers and green randomly.
Then cure.
山吹色を花芯のイエローの部分に少し足し、周りのグリーンの上にもランダムに乗せます。
硬化。

Step 12:
Apply thin layer of clear gel to make a surface smooth.
Then cure.
クリアジェルを薄く全体に塗布し、表面をスムーズにします。
硬化。

Step 13:
Take a black color on liner brush (here I am using tati Artchocolat Printemps brush) to make an outline of the center of the flower.
You don’t need to cover whole circle center of the flower. Make some space in between the lines, and keep the outline’s thickness varying.
ライナーブラシにブラックを取り、花芯の輪郭を描きます。
花芯はきっちり囲うのではなく、隙間を空けながら、線に強弱をつけます。


Where & How to buy Japanese Nail Art Supplies.
A completely FREE Guide.
Enter your name and email below and I'll send you this essential ebook guide for FREE! (Check your email inbox/junk)
Step 14:
Draw an outline of petal. remember, you don’t need to connect all lines – leave some space.
花びらの輪郭を描きます。
線は繋げないように、ランダムに描きます。

Step 15:
Take a generous amount of black on the liner brush and place random dots onto petal and around flower. These dots add some more visual break solidifying the irregular coloured petals.
適量のブラックをブラシの先端にとり、ところどころ引いた線や、グリーンの上にドットを置くように、ブラックを乗せます。

Step 16:
Draw tiny fine line’s to show the vein and creases coming from the center of the flower on the petals.
Then cure.
細く、細かい線を花芯から外側に向かってひきます。
硬化。

Step 17:
Finally my favorite part (and easiest!). Fold a lint free cotton in to a small piece that you can grab with a pair of tweezers. And take a bit of high pigment white color onto the cotton. Dab and remove some of the excess white gel on a pallette. You’ll need to do a bit of adjusting with this as you just want a little bit of white on it.
ネイルワイプ、又はスポンジを丸めピンセットで掴みます。
固めのホワイトのジェルを、ネイルワイプに少量つけ、パレットの上で叩きながら量を調整します。
最初は、極少量がつく程度で大丈夫です。

Step 18:
Dab the white over the entire design.
Then cure.
叩きながら、爪全体に乗せます。
少なかったらホワイトを足します。
硬化。

Step 19:
Contain and frame this entire design by drawing a line around of edge with some gold.
Then cure.
ゴールドのラメを爪の周りに引きます。
硬化。

Step 20:
If you’d like, place a sticker on the center of nail and apply a matte coat on the entire nail and cure.
Then you’re done! Hope you enjoyed this mini tutorial!
最後に、文字のシールなど貼り、マットコートを塗布して硬化したら完成!
Where & How to buy Japanese Nail Art Supplies.
A completely FREE Guide.
Enter your name and email below and I'll send you this essential ebook guide for FREE! (Check your email inbox/junk)
 Hi, my name is Jasmine Oshima! Part of JNA (Japan Nailist Association) and the founder of Neiru and Neiru Sensei. I am more than excited to share my knowledge help get you the latest techniques coming out of Japan’s nail art culture – the home and heart of nail art. Myself and my team of Neiru Sensei’s teach inside of Neiru to get you the techniques and build your creativity so that you can start applying what you learn to your service!