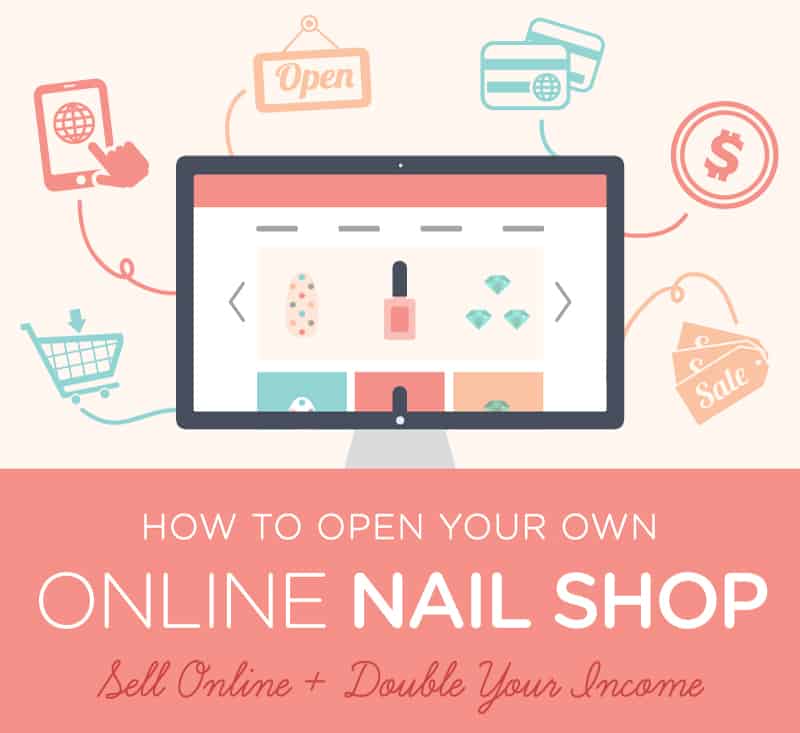
How To Open Your Own Online Nail Shop – Sell Online and Double Your Income
Selling online is a great way to make extra income. If you’ve been sitting on the fence or have once considered starting and selling your own line of nail polish, nail jewelry, your own handcrafted 3d nail decoration, or anything even outside the realm of nails – I’m here to tell you that selling online nowadays couldn’t be easier.
It’s exactly what we (both Jasmine and I) did with our first shop The Nail Room (inactive) and our latest online shop: The Neiru Shop. Our first shop “The Nail Room” started it as a little side project one summer evening to earn us some extra cash. We started with under $80 in sales our very first month and grew to bringing in over $5K in profit extra per month (at our highest point) for us while we both worked on different projects at the same time.
In this guide, I’m going to share with you the exact steps we took to earn a great passive income online by selling our own products, so that you can do the same too!
Start Selling in Minutes
With only a few minutes, several clicks of the mouse, and a small monthly investment — less than the price of most web domain and hosting packages, you’ll start selling your own line of nail polishes, hand made nail decorations, jewelry or nail tips with your designs.
Please note: All examples are pulled from our experience when running ‘The Nail Room’ and the ‘Neiru Shop‘.
Taking Action
As Picasso once said ‘Action is the foundational key to all success’.
One evening, back in June of 2013, both Jasmine and myself were discussing how it’d be great to bring in some side income by starting an online shop selling hard to find nail jewelry from Japan. She identified what she wanted to sell and at this point it was a matter of getting started and looking professional right off the bat.
We didn’t have a whole lot of money to invest in a computer programmer, web designer, etc, but at the same time, we wanted to avoid using lower cost services like Etsy because it’s so hard to be found on Etsy as well as Google searches don’t tend to rank Etsy stores very well. We needed maximum exposure, to look good right away, and we wanted it quickly.
Finding the right platform to easily build our shop and have it look great within minutes was part of our formula to generate traffic and eventually a profit. We didn’t want this to eat up our days and nights, so we needed something that we could just upload our products and start selling like a professional shop right away.
The Tool of Our Success: Shopify
![]()
We reviewed several shopping platforms and saw that ‘Shopify’ was exactly what we needed to get running. Shopify is an online shopping platform for you to set up your own online shop with ultimate ease and stand out as a professional and beautifully designed web store, the great thing, no one even knows you’re using Shopify and you stand out as a unique online shop.
[hr]Did you know: Brands that use the Shopify platform include Pixar, Evernote, Amnesty International, Wikipedia and General Electric.[hr]
1. Is Shopify right for you?
Whether you’re selling your own line of nail polishes, handmade nail decorations, jewelry for nails (like we did), or anything else – Shopify is made just for that. It provides everything you need to open an online store, have it all set up in under an hour, and start driving traffic and earning and income with your shop.
Don’t let such an establish web application like Shopify scare you. Starting off right will save you from headaches of transitioning to Shopify later after realizing how troublesome other platforms are. In this tutorial, I’ll guide you step-by-step through setting up an online eCommerce store on the Shopify platform.
Know the Benefits of Using Shopify
You don’t need to be a coding wizard or a designer – infact that’s what Shopify is really intended for. Shopify handles the coding and provides over 100 professionally designed themes to keep your storefront looking beautiful, updated and inviting.
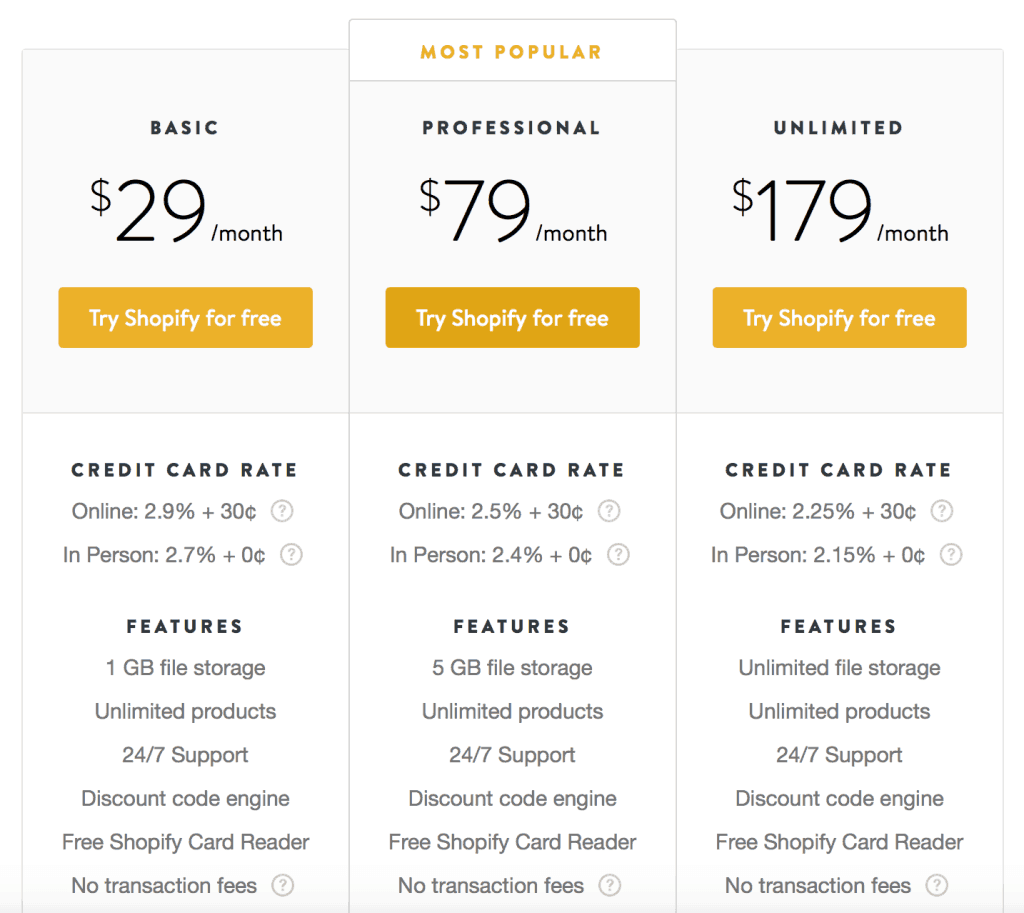
Your store can grow with you. With prices starting at $29 per month (that’s less than a dollar a day), you don’t need to be handing over big bucks to make opening a Shopify store a worthwhile investment. It easily cost us selling to one customer to recover our cost (our initial average order size was about $45 per customer order).
So – what’s the catch?
Shopify’s got so many cool abilities and functions that can really help you kickstart your shop – like setting up gift cards, 24/7 real person support, discount codes, and so many add-ons that only require a click or 2 to get running. But you’re going to ask – what’s the catch?
I’m going to be honest with you, the main issue with many others is cost.
Shopify is a tad more expensive than other platforms, especially when their 2% transaction fee for basic users is taken into account. So if you want to save money and are willing to put in the legwork and time on coding and design, then other platforms may be better for you. But don’t forget time spent coding and designing on your own is lost time for marketing and selling your products (or just relaxing)!
Out of the box – looking beautiful from the start and having amazing features packed in the box, look nowhere else. We saw the benefit in this immediately and after being a part of Shopify for more than a year (close to 2), we can say it’s totally worth it.
We could spend all day reviewing the pros and cons of Shopify, but the pros definitely outweighed the cons in our experience. But if you’d like – you can find more pros and cons of Shopify here. Mind you we’ve other sites like BigCartel to Woocommerce on WordPress, and we still love how much time Shopify saves you.
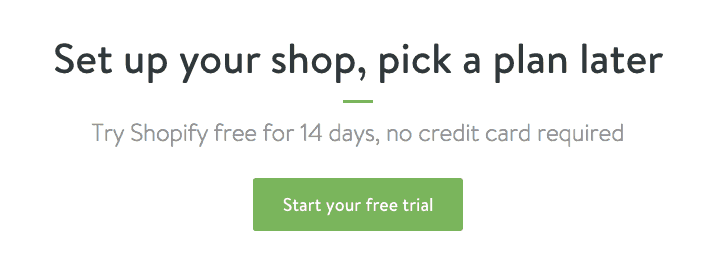
Just give it a try – FREE
Shopify offers a free 14-day trial, and you don’t even have to give your credit card details until your store goes live. If you’re thinking of setting up shop online, why not give it a whirl? This tutorial will show you how it’s done.
Get inspired by sample stores:
Design and aesthetics is so important for us in the nail industry, at the end of the day, we’re here to make things look pretty. And just to show you how pretty Shopify can look head over to Shopify (click here). Here you can browse Shopify’s features and take a look at sample stores.
Here’s our online shop (https://shop.neiru.me) and we’ve tweaked one of the premium themes by just adding our logo, product images and, colors!

2. Sign Up To Shopify
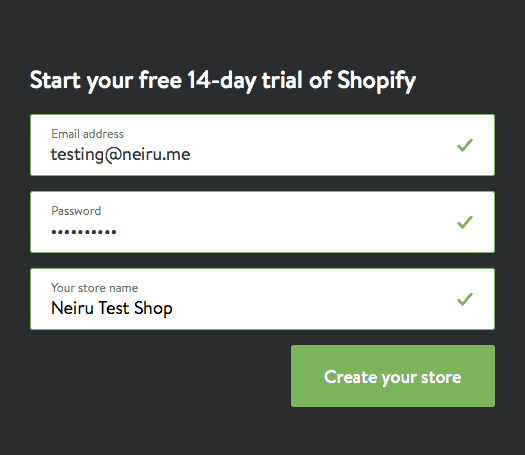
Step 1: Sign Up
When you’re ready to sign up, go to the homepage Shopify and enter your email into the text box and hit that green button to get started. Here’s just a sample. You’ll then enter some details. Your store name must be unique, otherwise Shopify will ask you to choose another name.
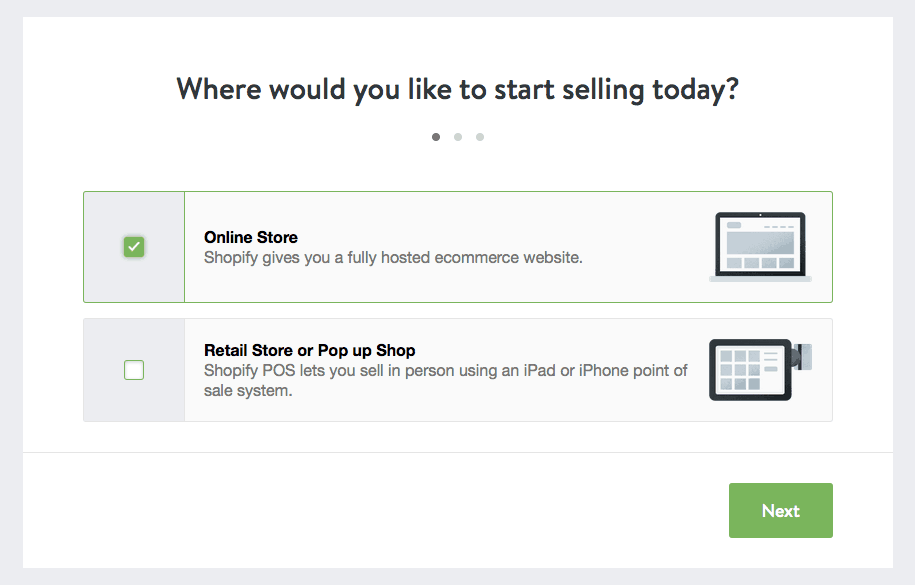
At the next step, I believe you’re reading this post to create an Online Store, go ahead and choose ‘Online Store’.
After you’ve signed up, set up can take a little while – but trust me, it’s easy.
Step 2: Confirm Your Details
Next you’ll be asked for a few more details about you, including your name, address, country and phone number.
You’ll also be asked if you have products, and what you’ll be selling. If you’re just trying out Shopify to see how it works, you can select “I’m just playing around” in the “Do you have products?” menu, and “I’m not sure” in the “What will you sell?” menu. Ultimately, what you choose doesn’t really matter, so don’t stress over this step.
When you’re done, click I’m done.
Step 3: Log Into Your Store
Now your sign up is complete, Shopify will send you an email letting you know your store is set up. In the email, you’ll be given a link to your store’s admin page. This is yourstorename.myshopify.com. (I know, it’s not the address you want, but I’ll show you how to change this below.)
To log in, go to your store’s admin page and enter your email address and password.
Once you’ve logged in, Shopify provides a dashboard to help you get your store set up.
3. Setup your your shop address:
As mentioned above, once you’ve signed up for your Shopify account, I strongly suggest you to change your domain or website address. Currently for shoppers to find your store it is ‘yourstorename.myshopify.com’.
You’ll want your own address for two reasons:
Trust
Having a unique website address will help you build trust with your customers. People tend to feel more confident purchasing from an established and professional looking website with a unique web address.
Search
More importantly, your store will be found MUCH easier through Google or any other search engine. It is a very common practice for ‘SEO’ (search engine optimization) to ensure you have your own website address instead of being under Shopify’s web address.
It’s a tiny cost to buy a domain through Shopify and comes to only $9 per year.
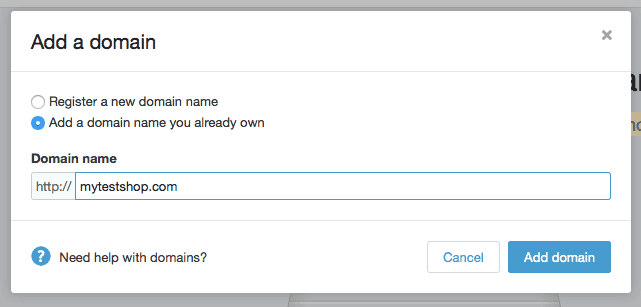
Step 1: Purchase your own shop address:
Make sure you’re logged in to your shop’s admin page and click on your ‘shop name’ on the top left of the screen.
You’ll then be brought to your ‘Home’ screen and when you scroll down you’ll see a section that says ‘Set up a custom domain’

Follow these instructions and find a domain that you think will work with your shop name.
4. Snazz Up Your Store with a Theme
Before stocking up your shelves, give your shop a virtual makeover. First impressions are so important on the internet, and you literally have less than a second to form an impression. Infact, a new visitor to your website will form a first impression in two-tenths of a second!
Step 1: Browse Shopify Themes
Having logged into Shopify, visit the Shopify Theme Store at themes.shopify.com. Here you’ll find over 100 themes to choose from, including a broad range of free themes.
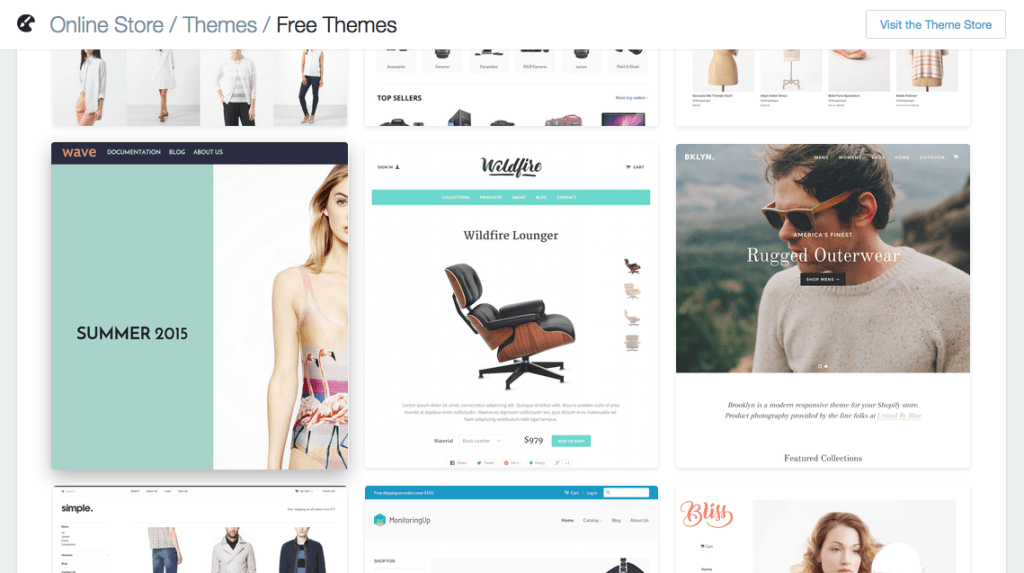
You can filter themes by paid or free; by industry (such as art, clothing, food, jewelry, etc.); and by features (such as drop-down menu or newsletter integration). You can also sort themes by price, popularity, and most recent.
Though, don’t let the ‘industry’ categories limit your imagination. A ‘clothing’ theme, can easily be re-purposed for selling hand crafted nail 3d pieces to your own nail polish line – the possibilities are endless with these themes.
When we first started The Nail Room (no longer active) and our new “Neiru Shop”, we used a theme that was designed with images of selling clothing and re-purposed it for it for our purposes to sell nail accessories and tools. All it took to re-purpose the theme was just using our own nail art brush photos – voila, a theme fit perfect for our nail brush online shop!
Step 2: Check the Theme Details and Reviews
Once you’ve found a theme you like, click on the theme’s sample image. You’ll be given more information about the theme, such as whether the theme is responsive (works on mobile devices like iPhones and tablets), and other theme features.
Scroll down to find theme reviews, to see what other users think of the theme.
Step 3: Preview the Theme
To see the theme in action, click View Demo. You’ll find this next to the Get Theme button.
If the theme comes in a range of styles, you can also view demos of the different styles by clicking on them.
Step 4: Get the Theme
Found a theme you like? Yay your store is almost setup! Now click the green Get Theme button.
Shopify will ask you to confirm that you want to install the theme.
Click Publish as my Shop’s Theme.
Don’t worry if you don’t feel 100% sure it’s the right theme for you. You can always change your mind later.
Step 5: Customize Your Theme
After the theme has installed, Shopify will let you know, and will give you the option to Go to your Theme Manager. Click this.
Your theme manager shows published themes (the one you installed or activated most recently) and unpublished themes (themes you previously installed).
To customize your theme, such as changing the colors and fonts, click Theme Settings.
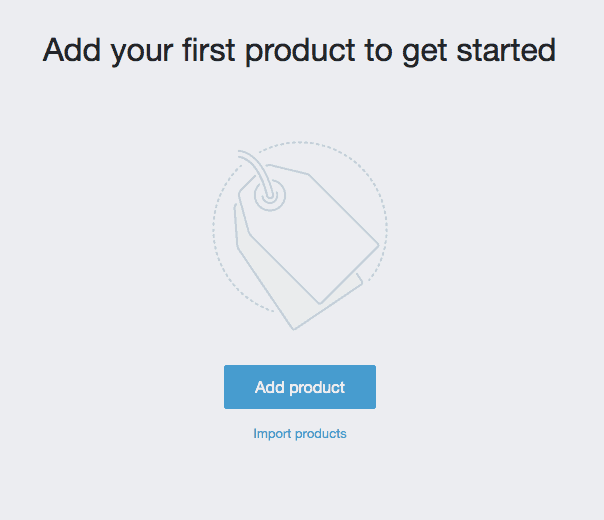
5. Add Products
Your shop isn’t a shop without any products to sell! Now that you’ve polished up your shelves with a nifty theme, you’re ready to stock them full with nail goodies (or any other goodies you desire to sell).
Step 1: Add a Product
To begin adding products, click the Products tab in the menu on the left.
Then click the Add a product button.
Step 2: Insert Product Details
This is when the work begins. For each product you list, you must enter a wide range of details. These include:
- The product name
- A product description
- A product image
- The type of product (e.g. polish, nail art studs)
- The vendor (i.e. the brand)
- Price
You can also select whether to charge taxes on the produce, whether a shipping address is required, and the product’s weight to calculate shipping.
You’re also asked for some more advanced product information. This is optional, but is handy for organizing your stock if you plan to sell a wide range of products. This information includes:
SKU – This is the code you use to track the stock in your inventory.
Barcode – The scannable lines that refer to your product’s data.
Compare at price – You can use this to show off your low prices compared to your competitors.
Step 3: Save Your Product
When you’ve finished entering product details, click the green Save button. Your product listing is complete.
6. Launch Your Store
That’s the basics of setting up a your online nail goodie shop. You’ve got a theme and products. All you need to do now is confirm which payment methods you accept, set your local tax rate, and confirm your shipping rate. All these can be done in the Store Settings tab, which you open by clicking Settings in the left-hand menu.
When you want to launch your store to the world, you’ll be asked for your credit card details. Shopify will start billing 14 days after you created your account.
Happy selling!

Where & How to buy Japanese Nail Art Supplies.
A completely FREE Guide.
Enter your name and email below and I'll send you this essential ebook guide for FREE! (Check your email inbox/junk)
 Hi, my name is Jessey! I’m the guy behind the scenes here at Neiru. I work around the clock to make sure we keep our Neirubees happy. From everything business to marketing to backend website, that’s where I’m hanging out. Thanks for reading my blog post!